
Digital Design Onboarding F26
Build a small RV32I-style processor around the provided top level, SRAMs, and
testbench. The goal is to get a working single-core CPU that can fetch
instructions from instruction SRAM, execute them, read/write data SRAM, and
halt cleanly when it reaches ebreak.
Some parts of this processor have been implemented for you as a starting point.
This project is intentionally open-ended on microarchitecture, but the baseline design should be at least 2 cycles because the SRAM read interface takes more than one cycle. Pipelining is allowed, but is not required.
Assignment
Implement the CPU in src/verilog/cpu/. Your design should connect through
the existing cpu_top.sv interface and use the provided memory/controller
structure in src/verilog/.
Requirements:
addiwith a positive immediate: add immediateaddiwith a negative immediate: subtract immediateadd: register-register addsub: register-register subtractlw: load word from data SRAM using an immediate offsetsw: store word to data SRAM using an immediate offsetbeqagainstx0: branch if zerosll: left logical shiftsrl: right logical shiftebreak: halt the CPU- Register
x0must stay zero
Provided Files
src/verilog/chip_top.sv: instantiates the CPU, SRAMs, and memory controllersrc/verilog/memory_controller.sv: arbitrates between external testbench access and CPU access to SRAM/register statesrc/verilog/sram_wrapper.sv: wraps the provided SRAM macrosrc/verilog/CF_SRAM_1024x32.tt_180V_25C.v: provided 1024x32 SRAM macrosrc/verilog/tb_processor.sv: main processor testbenchsrc/verilog/tb_fetch.sv: standalone testbench example for the fetch modulesrc/verilog/cpu/cpu_top.sv: CPU integration pointsrc/verilog/cpu/fetch.sv: instruction fetch scaffoldsrc/verilog/cpu/reg_file.sv: register file wrapper
Getting Started
-
Sign the EULA agreement for Cadence tools (https://eulas.ece.gatech.edu/Cadence/)
- Under Primary GT Affiliation -> Select "Researcher or Staff"
- Your Title: "Student"
- ECE Faculty Advisor / Professor Name : "Visvesh S Sathe"
- ECE Faculty Advisor / Professor Email: "[email protected]"
- Software needed for -> "Research"
- Research Project Name : "SiliconJackets"
- Agree to Cadence agreement
-
Download Georgia Tech VPN (https://vpn.gatech.edu/global-protect/getsoftwarepage.esp)
-
Log into the GlobalProtect VPN once downloaded(portal: vpn.gatech.edu)
- use your school username and password
push1sends a push to DUO,phone1gives you an automated phone call
-
Download FastX or MobaXterm (or your preferred remote Terminal Emulator)
-
Log in remotely to ECE Research server
- The setup will be similar but different depending on the terminal emulator you choose
- The following instructions work for FastX, but ask if you need help setting up with MobaXterm
- Ensure you are connected to GT VPN
- Open FastX Client
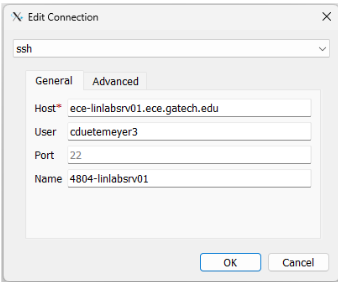
- File->Connections. Click the plus sign to add a connection.
- Host: ece-rschsrv.ece.gatech.edu
- Username: <your_GT_username>
- Port: 22
- Name: Whatever you want to call the connection
- Here is an example of what your screen should look like:
- Connect to the session and type in your GT password at the prompt
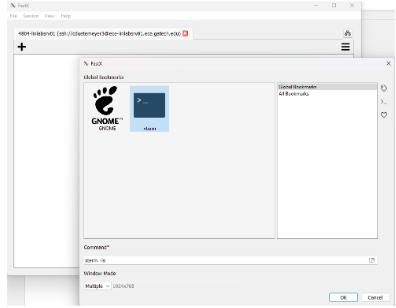
- Click the plus sign and then "xterm"
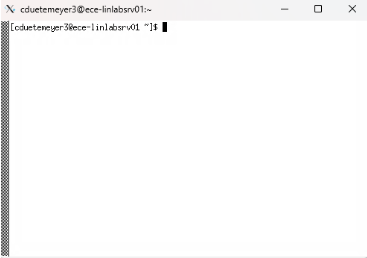
- You should now be remotely connected to the Research server Linux terminal
-
run the
tcshcommand to switch to c-shell. This command needs to be run every time you log into the server. (You should see a>and NOT a$) -
IMPORTANT: Do the following steps to set up the cadence tools
- Return to your home directory by running
cd ~ - Run
nano ~/.my-cshrcto enter the config file - Add the line
source /tools/software/cadence/setup.cshto the file (this allows you to run cadence tools if you have gotten your EULA approved; your ~/.my-cshrc file might be empty up until now, so just make this the first line) - Hit
ctrl + o, then hit enter to save - Hit
ctrl + xto quit - To apply the changes, type
source ~/.my-cshrc - Now, typing
xrunshould not show an error
- Return to your home directory by running
-
Clone this repo into the linux server. This is done using
git clone <url><--replace<url>with the github-provided url. You might be prompted to input your username and password for git. -
At this point, you can write your code in the files within the
src/verilog/cpufolder. -
Get comfortable with some linux commands, you probably only need
mkdir,ls,cd. -
Run the command
make smokefrom the repository root. -
cdintosim/behav, then run the commandmake simvision. -
Once the GUI has popped up, you should be able to drag the module into variable section, whereby the signals will appear on the right.


Writing Verilog
Need Verilog practice? We reccomend doing practice problems at HDLBits, it starts from foundational logic and shows basic waveforms.
Install the Verilog vscode extension to get better syntax.

When adding new files to the folder, you must add them to sim/behav/Include/cpu.include. Just follow the pattern of the other file paths linked there.
Running Existing Tests
From the repository root, list the available test commands:
make help
Run one RTL test:
make test TEST=add
Run every test, including any you've added yourself:
make regress
Clean generated files:
make clean
Useful variables:
TEST=<name>chooses a directory undertests/MAX_CPU_CYCLES=<n>changes how long the testbench waits for haltCROSSBAR_TIMEOUT=<n>changes how long external SRAM/register accesses wait
Example:
make test TEST=complex2 MAX_CPU_CYCLES=2000
Adding A New Test
To add a new test, create a directory under tests/ with the name of your
test:
mkdir tests/my_test
Add the assembly program here:
tests/my_test/program.asm
The file must be named program.asm. For example:
_start:
    addi x1, x0, 5
    addi x2, x1, -2
    ebreak
Add the initial dSRAM contents here:
tests/my_test/data.hex
The file must be named data.hex. It contains one 32-bit hex word per line,
addressed sequentially:
Line 1 -> 0x000
Line 2 -> 0x004
Line 3 -> 0x008
For example, this initializes data[0], data[1], and data[2]:
00000000
0000002a
000000ff
From the repository root, generate the machine code and expected outputs:
make generate TEST=my_test
my_test is the name of the directory under tests/. This command creates
program.hex, expected_regs.hex, and expected_data.hex.
Then run the testbench with that program and those expected outputs:
make test TEST=my_test
To run every test directory under tests/:
make regress
Writing Your Own Testbench
The tests above all drive tb_processor, the whole CPU. To exercise one
module on its own, write your own testbench. src/verilog/tb_fetch.sv and
sim/behav/Include/fetch.include are in this repository as an example to
copy.
Run one from sim/behav/:
make run_and_view INCLUDE_FILE_NAME=fetch.include TOP=tb_fetch
TOP must be the module name of the testbench itself. If you add a
testbench to an include file but leave TOP at its default, the other
testbench runs and yours never does.
Provided Tests
make regress runs every test directory under tests/, including any
tests you add yourself.
Most provided tests are opcode-specific: addi, add, sub, lw, sw,
sll, srl, branch_taken, branch_not_taken, and ebreak. complex1
and complex2 are larger programs that interleave several instructions
together (loops, data-dependent branches, computed addresses) to exercise
combinations the single-opcode tests can't.
You can add more tests, but do not modify the provided tests.
Each test directory contains:
program.asm: source assemblydata.hex: initial dSRAM contentsexpected_regs.hex: expected final register fileexpected_data.hex: expected final dSRAM contents
Generated files such as program.o and program.hex are created by
make generate/make test and can be removed with make clean-generated.
Tips for Waveform viewers

- Navigate hierarchy by clicking on the + sign next to module names (Yellow Box)
- Add Signal by clicking on a module, then clicking on the signal in the signal panel (Blue Box)
- Use the seek bar at the bottom of the waveform viewer to navigate through time and zoom.
- Right-click a signal to "Set Radix" (e.g., binary, hex, decimal)
- Right click on the signal window and use Save/Load to save a waveform setup so you don't have to re-add signals every time
- When saving, put the file outside of the WORKSPACE directory to avoid overwriting during
make clean
- When saving, put the file outside of the WORKSPACE directory to avoid overwriting during
Submission Expectations
You have two options to submit: In person or online.
Disclaimer: We will be running some back end AI and software similarity checkers on all submissions.
In Person Submissions:
- We will ask you to walk through the logic and answer a few random questions on must-know concepts.
- You still need to run
make submitand send the zip to the sjcheckoffs Discord Account, same as an online submission.
Additional Instructions For Online Submissions:
- Include a screenshot of all your tests passing with your gt username somewhere in the terminal in the screenshot
- fill in your name, GT username and Discord username at the top of the
Makefile, then runmake submitto run every test and build the zip - submit a zip of the src folder to the sjcheckoffs Discord Account
- Include any supporting documentation you may have used (diagrams, drawings, state machines)
If you have any questions, send a message in the onboarding-help discussion channel on the Discord server or reach out to a Digital Design team lead:
| Name | Discord | |
|---|---|---|
| Konstantin Gaydev | koki16 | [email protected] |
| Alfi Antony | xjfg | [email protected] |
| Wade Tran | justbasics | [email protected] |
| Gabriel Nech | gabrielnech | [email protected] |
| Padraig Littlefield | padgaig | [email protected] |
Onboarding Policy:
- Submissions must be made individually. Your work should not be copied from others. Collboration is allowed but submissions too similar will not be checked off.
- AI is NOT allowed for writing verilog. Use it exclusively for learning and you must show adequate understanding of the code you submit. We may ask you to explain any part of your code as a follow-up to your submission.
- Use your own account and linux credentials for submission. Do not run your code on someone else's crediantials. This is against GT policy and ECE IT rules.
- There is strictly NO extensions for onboarding deadlines. We do not have enough leads to accomodate extensions.
- Non-working submissions will not be checked off. Make sure your code runs and passes all checks before submission. We will provide feedbacks on all submissions but we do not guarantee timely feedback unless you submit at least 24 hours before the deadline.